Introduction
Just before Christmas I scanned a heap of old family photos, including many black and white ones containing my parents and grandparents when they were young. A number of these very precious photos were in need of some restoration, so after scanning I began cleaning them up in Photoshop CS. I was curious to see how effective it might be to hand-colour them in.
Although I spent a considerable amount of time finishing the example image below, I did an initial “rough draft” of this image in about 15 minutes that looked 90% as good.
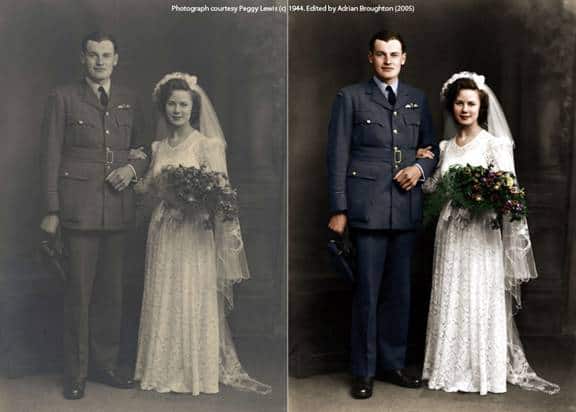
The thing I particularly like about it is that it not only looks like a “real” hand-tinted photograph, but the technique is actually quite similar to that used with photographic paints (apart from having the benefits of zoom and undo). While I’m using a black and white photo of my grandparents’ wedding day back in 1944, you could also use any coloured image, desaturated it, and follow the same process to provide a unique look.
Workflow top
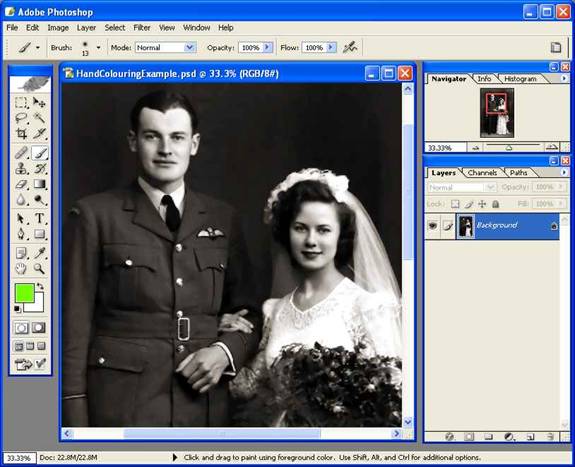
Firstly, open the image in Photoshop and perform any initial restoration tasks you intend to do, such as enhancing contrast, noise reduction, dust and scratch removal, healing blemishes or generally cleaning things up until you have a nice clear, clean black-and-white (or sepia) image, such as that shown below.
Next, duplicate the current layer by selecting the Background layer in the Layers window (on the right hand side), and then Choosing “Duplicate Layer…” the “Layer” menu. When prompted for a name for the new layer, enter something descriptive such as “Colouring Layer” to indicate that this layer adds the colour to your image.

Select the new layer, and set its mode to “Color” and opacity to “70%” using the drop-down controls that appear in the Layers window (circled on the right-hand side in the screenshot below).
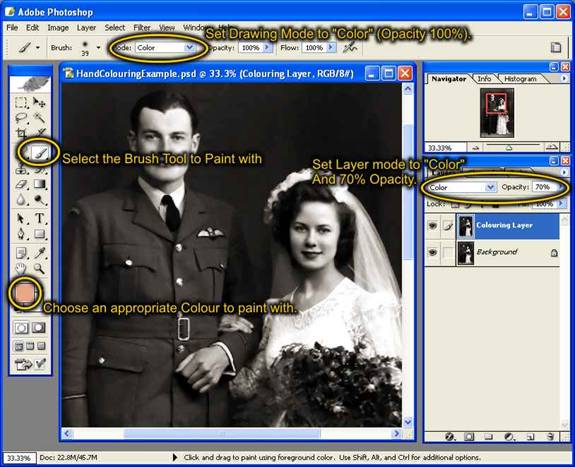
To start colouring, select the “Brush” tool from the toolbox as shown on the left-hand side of the window, ensuring the Brush mode is also set to “Color” (refer to top of screenshot above). Finally, choose the colour you wish to start tinting with. With this particular image, I will start with some skin-tones.
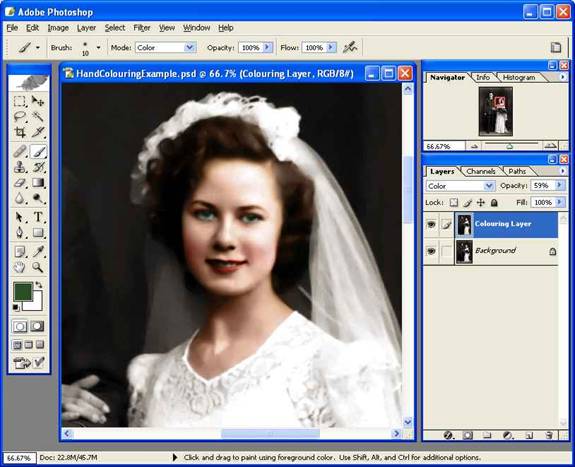
You will notice the image becoming tinted as you paint over the image with the brush. Adjust the brush settings (size, soft edge, opacity, etc.) to achieve various effects such as softly merging colours or giving sharp edges where appropriate. This screenshot below shows the result of tinting the bride’s face with a single colour. You can begin to see the effect, but it needs more work. I prefer to fill in the large areas with roughly the correct tint first, and then go over it in more detail afterwards.
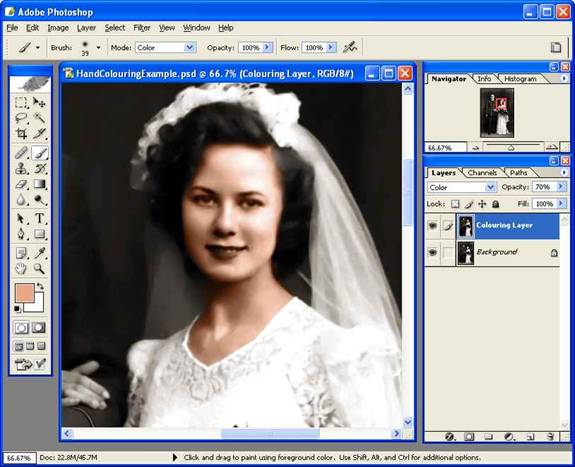
Now I start to fill in the features of the face below; applying red lipstick, brown hair, making the eyes green with white around them, and white teeth. It is important to note that skin-tones are generally not one uniform colour. I have found that with Caucasian people, the skin seems to often get redder as it goes into shadow and more yellow around highlighted areas. Also, certain areas such as cheeks and lips are naturally pinker than, say, the forehead. You may also want to “apply makeup” if you think it is appropriate (in the example below, I have applied lipstick and perhaps a little blush).
That’s basically the technique. Simply keep going with appropriate colours throughout the image, and your eyes will tell you what works and what doesn’t. If you are working on an “important” photo, I think it is well worth doing a bit of behind-the-scenes research to get the colours exactly right.With this project, I searched the web for images of the WW2 New Zealand Air Force uniform to get the colours of my grandfather’s uniform correct (don’t forget the badges, shirt, tie, etc) and also found out what flowers my grandmother had in her bouquet on her wedding day. When I showed the finished photo to my grandmother, she immediately noticed both of these details and was very happy that I had taken the time to make sure they were correct.
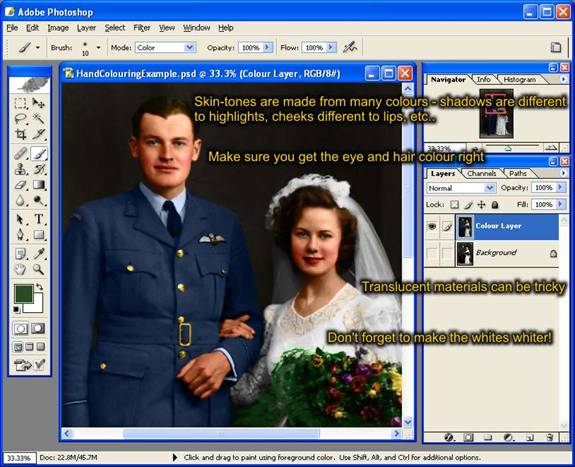
Below is another screenshot showing the “Colouring Layer” at full 100% opacity (instead of the 70% we initially set it to). This simply highlights and illustrates the variations in colour I used when painting the skin-tones, and shows the “real” colours I picked to get the end result. Depending on how saturated the colours are you are painting with, and your tastes in general, you may want to use a different opacity level for the layer.
Conclusion top
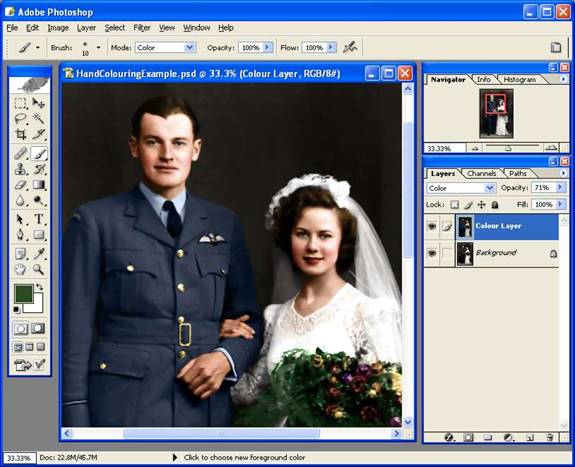
So here is the final product. Just some parting tips:
- I find that for my own taste, I’d rather err on the side of subtlety than over-saturate the image.
- Also, adding a subtle sepia effect to the whole image helps maintain the aged character of the photo.
- As I was trying to achieve the effect of a photograph that was hand-tinted in the traditional manner, I didn’t colour the background, which also ensures that the background does not detract from the main focus of the photograph.
Was this article helpful? Feel free to leave any feedback or comments.
This article copyright © 2005, Adrian Broughton.
The example photograph used courtesy of Peggy Lewis © 1944.
You may not reproduce these images or article without permission of the author.
Thanks for the information Adrian. I just had to comment on not only the excellent job you did on your example but also how beautiful your grandparents are. They make a great couple and it makes me nostalgic for that era when I see your Grandfather’s uniform. I’ll bet they’re good people, you can just tell.All my best.
Thanks again!
Thanks for the great article Adrian Broughton. I am now learning photoshop it is very helpful to me.
It was very easy to understand and I did a photo right away! I loved the results. Playing around with the opacity of the layer and the brush made a huge difference.
Thank you!
thanks for this tutorial!! it’s great. i loved doing it. your grandparent’s wedding photo is beautiful.
thx for the tutorial helped me!! good for newbies
Thanks for an excellent tutorial Adrian,
I have experimented a little with old family photographs with some success but your tutorial is the first I have seen that with an easy to follow layout.
You have inspired me to have a go at some other family images.
thanks
Brian
Among the 15 tutorials, i choose the ” Hand Colouring Black and White Image ” because this kind of restoration is one of the best. It brings back the life of the old pictures that I want to restore. The steps are easy to follow and understand and at the same time, you will enjoy because you only need the appropriate colour for the picture that you want to restore. It is also very helpful because nowadays, some people are doing this things for their business and it is some kind of expensive. So me as a I. T student it really helps me because i don’t need to go to photo shops to restore the old pictures of mine, because I know this kind of things.
I choose hand colouring because it’s easy to learn and to understand the sequence of hand coloring and for me color gives life in photo and hand coloring is refers to a method of manually adding a color to black and white picture , generally either to heighten the realism of the photograph or for artistic purposes. Hand-colouring is also known as hand painting or overpainting. And the advantages of stunning color photography, we can still use Photoshop to replicate this technique, and add great charm to black-and-white images. But there are steps to learn Hand colouring
I have a photo that was black and white made in the 1950s that was later a hand painted colour. It needs some restoring. Do you do this and how much does this cost?
You did such a beautiful job on this restoration! I have a hand-painted head shot of my husband’s mother from the late 1940 (I think), That has some minor scratches on it Do you do the restorations for others or just write about them?